


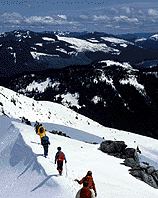
The premier guide to Winter Camping in the Adirondacks
featuring valuable tips and techniques and essential
backcountry information.
WINTER SURVIVAL ITEMS:
MULTI
PURPOSE TOOL
Such as a swiss army knife or a Leatherman tool. You will
need this to fix broken equipment, cut branches for a shelter, cut wood for a
fire. This item will always be used and if you don't have at least a knife you
might not make it.
STEEL WIRE
You will need this to
suspend firewood in the air to have a fire to keep you warm. If the snow is deep
you cannot make a fire directly on the snow. Bring at least 10 ft (or 3 meters)
of wire, preferably stainless but regular will do fine too. If you are snowshoeing
in an area that never has very deep snow you can skip this item.
Make a screen
with the wire and make sure it's anchored well on the snow or to nearby vegetation
or rocks and make you fire on top of it.
DUCT TAPE
Perfect
for fixing a broken snowshoe or to fix supports around a broken leg. Even if you
don't break your legs or your snowshoes duct tape will still come in handy for
fixing pretty much anything.
RICE
Perfect emergency
food. Very light weight and full of energy. In an emergency you just need lots
of energy, don't worry so much about vitamins. Bring about 3 cups of rice per
person per day you think you will spend in worst case.
SMALL COOKING
POT WITH LID
To boil water to keep you warm and to cook rice to eat.
If your pot has a lid it will heat water more efficiently.
WOOD POWERED
CAMP STOVE
You need to bring a stove, no question about it, your best
source of heat will be drinking plenty of hot water and you need a stove to boil
all that water, without a stove you're dead for sure. What ever you do, don't
bring a propane stove or any type of stove that runs on gas or liquid fuel. Gas
and liquid stoves work fast and efficiently but they have a number of problems
that only show up in cold temperatures, propane stoves sometimes simply don't
ignite if it gets too cold, they also have moving parts and complex nozzles that
can get jammed or clogged by ice. Relying on a propane or liquid fuel stove in
the winter is suicide. You need a very simple wood stove with absolutely no moving
parts such as the Trailstove (click for website). These types of stoves are slower
to cook on than propane stoves but they ALWAYS work.
LIGHTERS AND
MATCHES
Bring plenty of lighters and matches. Lighters are very small
and light so bringing extra ones in case one doesn't work is a very good idea.
Without means to make fire you will freeze to death. You can try to make fire
like a caveman by spinning a stick against a piece of wood but that is a skill
that takes practice to learn and if you don't already have that skill you'll freeze
to death before you have it figured out.
Hazards of Cold Weather Exposure
Frostbite, snow blindness and hypothermia
Precautions
Wrinkle face to stop stiff patches forming, pulling muscles in every direction. Exercise hands.
Watch yourself and others for patches of waxy, reddening or blackened skin, especially faces, ears and hands.
AVOID tight clothing which will reduce circulation.
Never go out without adequate clothing - however briefly. Avoid gettig clothing wet, through sweat or water. Dry it as soon as possible if this happens.
Knock snow off before entering shelter, or leave outer clothing at entrance. Snow will melt in warmth giving you more clothing to dry.
Wear gloves and keep them dry. NEVER touch metal with bare hands.
AVOID spilling gasoline on bare flesh. In sub-zero temperatures it will freeze almost at once and does even more damage than water because of its low melting point.
Be especially careful if you have been working hard and are fatigued. If you are sick - rest.
View topo maps of the Adirondack
High Peaks
View
the latest weather information for the entire Adirondack Region
New
York State Public Campgrounds
DEC operates 52 campgrounds
located in the Adirondack and Catskill Parks. DEC campgrounds provide a wide variety
of experiences, including island camping, tent and trailer camping, boat launching
facilities, hiking trails, beaches and day use areas with picnic tables and grills.
For campers who want a wilderness experience, back country camping is available.
State campgrounds outside the Forest Preserves are operated by the NYS Office
of Parks, Recreation and Historic Preservation. http://www.dec.state.ny.us/website/do/or2top.html
Click here for a quick list of campgrounds that are open during the fall season
Winter Water
1) Do not eat snow! It takes an
incredible amount of energy to transfer water from one state to another (solid
to liquid). You are burning up too many calories to do this which can quickly
lead to hypothermia.
2) Water may be obtained by digging a hole in frozen lakes or streams where there is running water beneath the ice. Be careful about falling in. Remember, in most cases water will need to be purified from giardia and other bacteriological contaminants (see below).
3) Snow can be melted on a fire or stove to make water. It should be clean snow, no yellow (urine) or pink (bacterial growth). Because it takes so much energy to convert from one state to another you should have some water in the bottom of your container. Heat this water up and add snow to it slowly so it turns to slush and then water. This is much more efficient. If you dump in straight snow, you will only burn the bottom of your container and not make any water. By volume it takes about 10 quarts of snow to make 1 quart of water. Snow does not need purification.
4) Winter Solar Water Collector - In a spot that will remain sunny for several hours, dig out a depression in the snow about 2 feet across and 1 foot deep. If possible, line this depression with a foam pad or other insulation (not essential but it speeds the process). Then spread a dark plastic bag (trashbag) over the depression forming a shallow dish pan. All over the raised margins pack clean snow. Drawn by the dark plastic the sun's energy will melt the snow and water will collect in the depression.
5) Water in a pot can be stored overnight by placing the pot lid on and burying the pot under a foot of snow. Snow is such a good insulator that it will keep the water from completely freezing even in sub-zero temperatures.
6) Personal Water - You should have a water bottle with a wide mouth, otherwise the opening will easily freeze up. During the day you should carry at least one bottle next to your body (usually with a shoulder strap arrangement). Your body heat will keep it from freezing and the bottle is handy to rehydrate yourself throughout the day. Insulated water bottle holders are available for this. Other bottles can be kept upside down in an insulated container (sock etc.) preferably in an outside pocket on your pack. Being upside down will keep the mouth of the bottle from freezing. Keep in mind that the lid must be on tightly or water will leak all over the place. A cold water bottle may have ice crystals in the threads. As the bottle heats up from body temperature the ice may melt causing the cap to loosen also the lid may expand with heat causing leakage. At night keep your water bottles in your sleeping bag to prevent them from freezing.
7) Getting Water - sometimes filling pots and water bottles from a stream or lake is a major expedition in itself. Make sure that the area you plan to get water from is secure. Avoid steep banks that might lead to a plunge and make sure any ice is sufficiently stable to hold your weight. Also make sure you don't get your mittens soaked with icy water. A loop of string tied tightly around the water bottle neck will allow you to lower a bottle in by hand or with a ski pole or ice axe. Don't trust pot grips on a large pot, with mittens you can lose your grip and your pot. Fill the pot up part way and then use a water bottle to top it off. Mark the area so you can find it next time.
8) Water purification - keep in mind that water gotten from streams in the winter time may have bacteriological or other contaminants. You should check with local rangers about any water problems before going in. If the water does need to be purified, the best methods during the winter are either:
Boiling
- for at least 3-5 minutes (add 1 minute for every 1,000 feet above sea level
so that at 10,000 feet you are boiling for 15 minutes). This is the best method
in winter situations.
Less Effective Methods:
Filtration- using a filtration
pump system such as the PUR, First Need, or the Katadyn is not recommended in
subfreezing temperatures. Keep in mind that the water in filters can freeze preventing
them from working. Also, as the water freezes, it expands and may crack the filter,
rendering it inoperable or even worse transmitting harmful microorganisms into
your system. For these reasons, filters should be used with great caution in the
winter. Be careful of inferior filters which do not strain out many organisms.
Chemical treatments (iodination or chlorination) are not recommended because
they become ineffective at low temperatures. Only use these methods if the water
has been preheated to about 60o Fahrenheit.
Winter Shelters
Tents
In many
cases you will be traveling to areas without shelters, so you need to bring your
own. There are a range of tents available. The key factors are:
Strength
- to withstand both wind and snow. In general it is recommended that you use a
tent specifically rated to be a 4-season tent. Four season tents typically have
stronger poles (to hold snow loads).
Ability to shed snow - the tent must
have a roof line that allows snow to fall off. Otherwise the tent will load up
and the weight will cause it to collapse. (Four season tents are designed this
way).
Room - you need lots of internal space on a winter trip for all the
bulky gear you are carrying. Also you may get snowed in and need to stay in the
tent for an extended period of time. Being snowbound in a cramped tent with several
other people can be unpleasant.
Rainfly - the tent must have a rainfly. Having
a breathable inner tent wall with a waterproof fly outside helps reduce condensation
in the tent (see below). It also helps provide better insulation by increasing
(relatively) unmoving air space layers. Typically a tent will be 10-20 degrees
warmer than the outside air (once your body is inside heating it up).
Free
standing tents (dome type) are recommended because they shed snow fairly well
and they provide efficient interior space. Make sure that the manufacturer recommends
the tent for winter use. Many dome tents are designed for three season use only
and the stitching and the poles are not designed to take the weight of snow.
Other shelter options include the Black Diamond Megamid. This a single, center
pole, pyramid tent with no floor. They require some staking but are quit roomy.
By adding a space blanket as a floor, and covering the edges with snow, you can
seal off the tent quite well.
Another issue with tents is condensation. During
the night your breathing pumps a great deal of humid air into the tent. This air
rises and hits the inner tent wall where the moisture condenses into ice. These
fine particles can get all over you and your gear. It is best to brush the ice
particles off the tent in the morning and sweep them outside. A frost liner, hung
inside the tent, allows the moisture to pass through and provides a layer between
you and the ice.
Tips for Tents
Make sure you bring extra poles with
you and pole splints in case a pole breaks.
A ground sheet (like a space
blanket or tarp) can help protect your tent floor (the ground underneath usually
turns to ice from your weight and body heat. Sharp ice can tear the floor)
Always stake you tent down if you are going to be in windy areas or leaving your
tents during day excursions. Bring stakes or know how to stake using "dead
men."
Wisk Broom - is an important addition to every tent. You should
brush all the snow off your clothes and boots before getting into the tent at
night. This helps reduce condensation and water buildup in the tent keeping you
and your belongings dryer. Also when snow gets into the tent at night it often
melts from your body temperature, then freezes during the day when you are not
in the tent.
Cooking - Do not cook in a tent. It is possible to asphyxiate
yourself from accumulated carbon monoxide and the water vapor leads to extensive
condensation.
Winter Campsite
Keep the following factors
in mind when choosing a winter camp.
Camping
regulations
Other campers
Wind - avoid ridge tops and open areas where
wind can blow down tents or create drifts.
Be aware of "widow makers",
dead branches hanging in trees.
Avoid low lying areas where the coldest air
will settle.
Avalanche danger - select sites that do not pose any risk from
avalanches.
Exposure - south facing areas will give longer days and more
direct sunlight.
Water availability from lakes or streams will prevent you
having to melt snow for all your water.
Level ground
Setting up Camp
When you first get into camp, leave your snowshoes or skis on and begin to
tramp down areas for tents and your kitchen. If possible, let the snow set up
for 30 minutes or so, this will minimize postholing once you take snowshoes or
skis off. Set up your tents with the doors at 90 degrees to the prevailing winds.
Stake the tents out. On a cold night you can build snow walls on the windward
side of the tent. Mound the sides of the tent with snow (have someone inside pushing
out on the tent to keep it from collapsing. When the snow sets up you will have
a hybrid tent-snow shelter which will have better insulation than the tent alone.
Dig out a pit in front of your tent for a porch. This makes taking your boots
off much easier. Put your foam pads in the tent and unstuff your sleeping bag
and place it in the tent so it can "expand" from it's stuffed size.
If the snow is deep, you may want to dig out a pit for your kitchen. Dig a pit at least 6 feet in diameter (for 4-6 people). You can mark out the circle using a ski or a rope. Dig down about 2-3 feet and pile the excavated snow around the perimeter. Pack the snow at the perimeter of the hole with your shovel. This will give you a 4-5 foot deep area, protected from the wind. You can carve out seats and benches, put your skis or snow shoes behind the pile as backrests, carve places for stoves, etc.
General night sequence - after dinner, getting warm water for water bottles, and putting gear away, it's time for bed. This is a general sequence:
Get
warm before you get into your bag. Do some jumping jacks, etc. so your heat is
built up for when you get in your bag.
Get any clothing/gear you will need
out of your pack as well as full water bottles and tomorrow's lunch.
At the
tent door, brush off any snow with the wisk broom. Sit down inside the tent entrance
and, keeping your boots outside, either have a friend brush them off, or remove
them and brush them yourself.
Climb into the tent and close the door.
Strip off your layers of clothing to what will be appropriate in your sleeping
bag. The more layers you wear the better insulated and the warmer you will be
(contrary to the myth that says sleep in your underwear). However, too much clothing
can compress dead air space in the bag and reduce its effectiveness.
Remove
any wet/damp layers and replace them with dry ones, particularly socks.
Pre-warm
your bag with your body (get it nice and toasty).
Place damp items in the
sleeping bag with you near your trunk. This will help dry them overnight.
Place your boots in your sleeping bag stuff sack (turned inside out) and place
the stuff sack between your legs. This will keep them from freezing during the
night and the stuff sack keeps your legs from getting wet.
Put water bottles
and food with you in the bag.
A hat and polarguard booties are recommended
to help keep you warm.
Try to sleep with your face out of the bag. This reduces
moisture build-up inside the bag (which could be catastrophic for a down bag).
A scarf on your neck may be better than using the sleeping bag neck drawcord (which
makes some people feel a little claustrophobic and creates a difficult nights
sleep).
You will probably wake up a number of times during the night. This
is normal in cold weather. Your body needs to change position to allow for circulation
to compressed tissues and to move around a bit so that muscle movement generates
more heat. If you are still cold, eat some protein to "stoke up your furnace"
If that doesn't work, wake a tent-mate for some extra warmth.
With 10 or
more hours in the tent, you are likely to need to urinate in the middle of the
night. Go for it! Otherwise you won't get back to sleep, and your body is wasting
energy keep all that extra fluid warm. You will be surprised how quickly you can
get out and back in and your body really won't chill that much.
It is useful
to have a thermos of hot drink in each tent.
Snow Shelters
The following snow shelters are also useful in winter. Keep in mind that there
is great potential for getting your clothing wet while constructing these shelters.
You should be dressed accordingly.
Snow Mound Shelter (Quin-zhee) - If the party does not have the experience or the snow conditions aren't good for an igloo, a snow mound shelter can be made. In a selected spot, place an upright marker (ski pole, ice axe, etc.) to mark the center. Tie a cord to the marker and scribe a circle in the snow to indicate the pile size. The rule of thumb for size: if the snow in place is not to be dug out, the radius should be the interior size plus about 2 feet; if the snow in place is to be dug out, about 1 foot can be subtracted from the radius for each foot of in-place snow. Piling the snow for a two person shelter will take two people about an hour. Pile loose snow within the marked circle with shovels, tarp etc. Don't compact the snow. When the mound is the right size and shape, do not disturb it; allow it to compact naturally - minimum time one hour. Chances of collapse are greatly reduced if you let it settle for two hours. Thirty-five degrees is the natural angle at which loose snow rests. Be sure to allow the snow to settle at this angle. Otherwise you will have thin spots or a buckling roof when you excavate the interior. After compaction you are ready for digging. The entrance direction should be away from the prevailing incoming weather. From the entrance point start digging toward the marker. Pass the snow out to helpers. As soon as you reach the marker, do no not disturb it. This is your guide for excavating the interior. Clear out the inside to the intended radius. To check on wall and roof thickness, measure with a stick poked through. When the dimensions check, remove the marker and trim the interior. Then install a vent in the roof. Get rid of waste snow promptly before it hardens. The process is a wet one so make sure you have waterproof gear on and good shovels for making the mound and digging out.
Snow Cave - A snow cave can be dug into a hillside. Dig the entrance up so that the door is below the sitting level. Also there are natural snow caves formed by the overhanging branches of trees covered with snow. By digging down you can get into the cave beneath the branches. In both cases you should poke a ventilation hole and keep it clear.
Igloo - can be constructed if there is snow of the proper consistency to pack into hard blocks. Keep in mind that building such a shelter takes a great deal of energy and time. Two skilled persons can build a two person igloo in 2-3 hours with proper equipment and good snow. Obviously several such structures would need to be built to hold a larger group. Building an igloo is a process that requires a certain amount of artistry, but is less of an energy expenditure than a snow mound shelter. In general, rectangular blocks roughly 24" by 18" by 6" are cut and stacked in an ascending spiral. The rectangular blocks are placed vertically and the bottom shaped so that only the two bottom corners are supporting the block. Then the block is tilted inward and the vertical edge contacting the adjacent block is cut away until the weight of the block rests only on the upper corner. The weight of the block is supported by the diagonally opposite corners, while the third corner prevents rotation. Once the first row is laid you shave off the tops of several blocks ( 1/4 - 1/3 of the circumference) to create a ramp and build upward in a spiral. Once the structure is complete, snow is packed into all the open joints. (See the Off Belay reprint Igloo.)
Snow Pit - This structure can be created by digging a trench in the snow down to ground level (if possible). The structure should be a little longer than your body and 3 - 4 feet wide. Line the bottom with insulative material to insulate you from the cold ground (in an emergency you can use 5-6 inches of evergreen boughs). A roof can be made of skis and poles or overlapping boughs and sticks then covered with a tarp and then loose snow or blocks of hard pack snow. The doorway will be a tunnel in from the side. This can be plugged with a door of hard pack snow. A ventilation hole must be poked into the roof for air flow. Keeping a stick in this hole and shaking it every so often will keep the hole open. If possible, the entrance should be lower than the level of the trench, this keeps the coldest air in the entrance rather than in the trench.
Ice Climbing | Winter Camping | Ice Skating | Snowshoeing |Bobsledding
Luge | Winter Horseback Riding
Dining | Summer Sports | Winter Sports | Arts & Crafts | Attractions | Shopping
Adirondack Kids | Adirondack Lifestyles | Business Profiles | Business Directory | Classifieds
Meet Our Sponsors | Adirondack History | Chat Room | Return Home

Saranac Lake, New York 12983
Phone: 518-891-3745 Fax: 518-891-3768
E-Mail: Adirondacks.com
This website is
owned and operated by
adirondacks.com internet publishing group.
For advertising and editorial content,
please contact Rob Grant;
adirondacks.com
reserves the right to reject,
modify or cancel any advertising at its sole
discretion.
© Adirondacks.com - all rights reserved
New
York State & Vermont
Travel Guide Network
We
invite you to visit one of the largest and most comprehensive award winning travel
networks in New York State
& neighboring Vermont .
Choose your visitor
guide by clicking on any one of the links below!
Adirondacks.com
| AdirondackRealEstate.com |
AdirondackRentals.com |GlensFalls.com
| LakePlacidNY.com | SaranacLakeNewYork.com
| Saratoga-NewYork.com | Upstate-NewYork.com
| LakeChamplainValley.com | Burlington-Vermont.com
| ThousandIslandsNewYork.com |
MaloneNY.com | NorthCreekNY.com
| WestportNewYork.com | CliftonParkNewYork.com
|
Albany-New-York.com
| Troy-NewYork.com | Utica-NewYork.com
| Rome-NewYork.com | WarrensburgNewYork.com
| Potsdam-NewYork.com | AdirondackHighPeaks.com
| Canton-NewYork.com
| Massena-NewYork.com | Plattsburgh-NewYork.com
| LakePlacid-NewYork.com | GlensFalls.net
| SchroonLakeNewYork.com | KeeneNY.com
| KeeneValleyNY.com | ChestertownNY.com
| GlensFallsNY.com | TiconderogaNewYork.com
| TheChamplainValley.com | Champlain-Valley.com
| ChamplainValleyRegion.com
|
ChamplainValley.net | SaratogaSpringsRegion.com
| Watertown-NewYork.com |
SaranacLakeNY.com | HighPeaksWilderness.com
| VisitUpStateNewYork.com | VermontTravelGuides.com
| Burlington-Vermont.com | StAlbans-Vermont.com
| Rutland-Vermont.com | Middlebury-Vermont.com
| Montpelier-Vermont.com
|
Bennington-Vermont.com
| Brattleboro-Vermont.com
| NewYorkSkiing.com
|
New YorkHiking.com | AdirondackHiking.com
| AdirondackFishing.com
|
AdirondackCamping.com
| AdirondackSkiing.com
| LakePlacidSports.com
| LakePlacidSkiing.com
| SaratogaSpringsRegion.com
|
SaratogaInns.com
| SaratogaHotels.com
| SaratogaAttractions.com
| SaratogaSpringsDining.com
|
SaratogaSpringsLodging.com
| SaratogaSpringsRestaurants.com
|
SaratogaDirectory.Com
| LakePlacidNY.com
|
LakePlacidHotels.com |
LakePlacidShopping.com | LakePlacidRestaurants.com
| LakePlacidInns.com
|
LakePlacidDining.com
| LakePlacidResorts.com
| LakePlacidSports.com |
LakePlacidSkiing.com |
LakePlacidHockey.com
| LakePlacidSchools.com
| OldForge-NewYork.com | AdirondackRestaurants.com
AdirondackWeddings.com | AdirondackCamping.com
| AdirondackFishing.com
|
AdirondackShopping.com | AdirondackLodging.com
| AdirondackHotels.com
| AdirondackDining.com |
AdirondackSkiing.com | AdirondackWeather.com
| AdirondackCrafts.com | VillageofLakeGeorge.com
|
DiscoverLakeGeorge.com
|
Lake-George-NewYork.com
| LakeGeorgeClassifieds
We
also invite you to visit our comprehensive network of Florida Travel Web Sites:
Florida Visitor
Guides.com
www.Daytona
Visitor Guide.com
www.Daytona Travel Guide.com
www.Daytona Beach Visitor Guide.com
www.Visit Daytona Florida.com
www.New
Smyrna Beach Guide.com
www.New
Smyrna Hotels.com
www.New
Smyrna Rentals.com
www.New Smyrna Beach Lodging.com
www.New Smyrna Beach Restaurants.com
www.New Smyrna Beach Dining.com
www.New Smyrna Beach Shopping.com
www.New Smyrna Beach Weather.com
www.New Smyrna Florida.com
www.New-Smyrna-Beach-Florida.com
Anna
Maria Island Guide.com
Anna Maria
FL.com
Anna-Maria-Island-Florida.com
Anna-Maria-Island-Rentals.com
Anna-Maria-Island-Real-Estate.com
Anna
Maria MLS.com
Anna
Maria Island Beach Rentals.com
Anna
Maria Island Photos.com
Anna
Maria Property.com
Anna Maria
Island MLS.com
Anna
Maria Island Real Estate Agents.com